Tag: revlon

I’m back! Sorry for the disappearance!

Well I’m back! I didn’t go anywhere but I did start a new job that is all consuming and that has not left me a lot of time to blog. Nevertheless, we soldier on!
While I haven’t been writing the blog I have been keeping up with all the wonderful nail artists on Instagram. I also post on Instagram and you will note that I’ve put up some new nail art there.
Today I will be showing you some woodland inspired nails. I love vintage anything, especially vintage printed fabrics. Toile being my all time favorite with children’s patterns coming in a close second. I love the friendly cartoon illustrations of the various animals.

20140426-095456.jpg
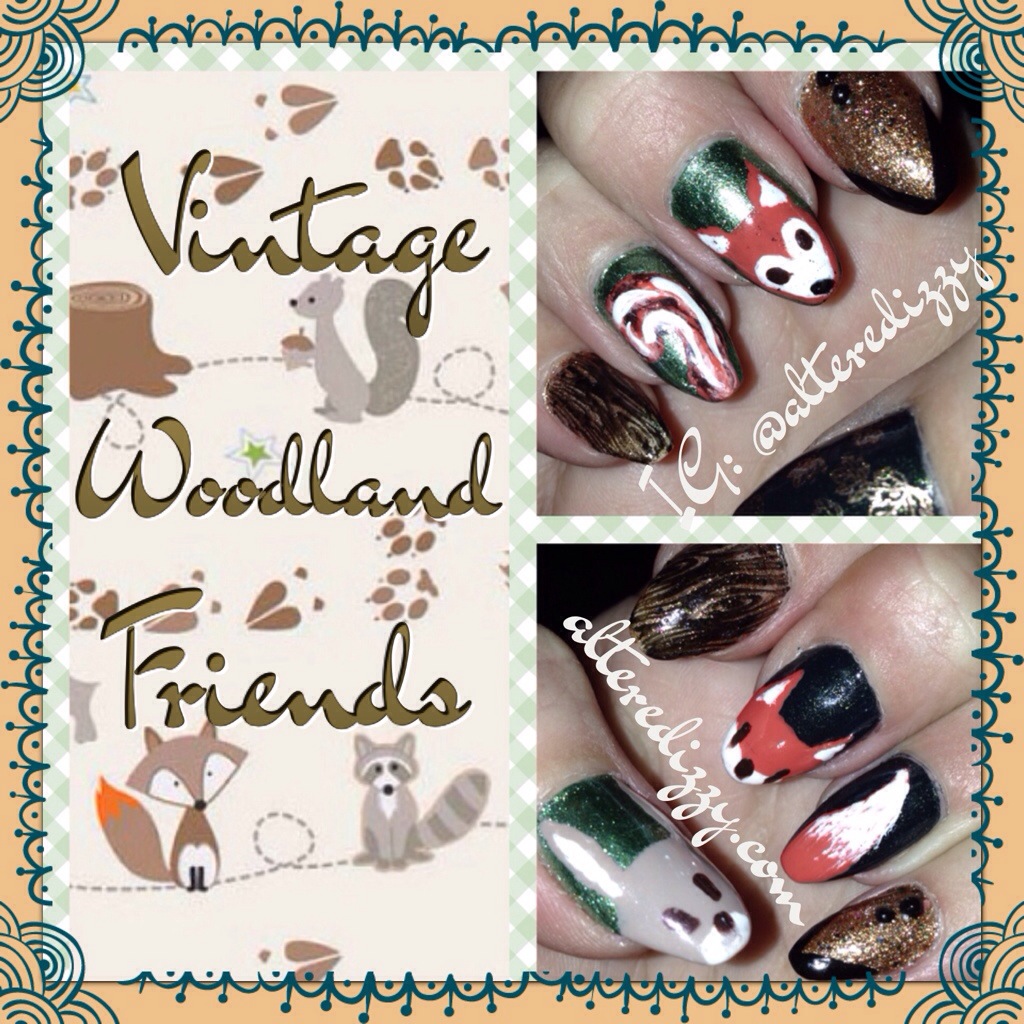
I love how the squirrel and the bunny came out. I also love the pairing of the wood grain with the animals. Next time I do these little guys, I want to stamp my background with the wood grain and paint my animals on top.

For this look I used:
Revlon copper penny
Rimmel rags to riches and black satin
Acrylic paint
Some rhinestones from cheeky beauty
Jumbo cheeky plate D

Hope you liked them! Next time I plan on showing you my line work! I’ve been practicing! Stay tuned and welcome back!

Vintage Damask Nails

Wow, it has been a while since I posted on the blog, I work in education and have been on summer vacation since the end of June, I may have been a little lazy since then lol. That being said, today my manicure is reminiscent of a vintage damask cloth, damask is a woven fabric with a pattern that is visible on both sides. It also reminds me of vintage tea towels from the 70’s, so an orange and teal colour pallet it is!

20130722-223849.jpg
I used the reverse stamping technique again, seriously this is the best technique ever! I’m not 100% in love with this mani but it is a fun colour pallet and I wore it for nearly a week!

For this look I used:
Seche Vite Top Coat
Revlon cloud, eclectic
Sally Hansen Xtreme Wear perky pink
Maybelline Color Show sweet clementine
Ice shell pink
Essence date in the moonlight
O.P.I. Fast dry top coat

Plates used:
Pueen 38, 48

The rhinestones I used are from my huge haul from Cheeky.

Up next on the blog is a pink art nouveau manicure!

Reverse Stamping Sari Print Manicure

Hello readers!! Today I have a super duper exciting manicure and new technique to show you! I’m calling it Reverse Stamping and I discovered it on the amazing Art of Nail blog! This woman is a genius! You start off your stamping process as usual: put the polish on the plate, scrape off the excess, use your stamper to pick up the design. Here comes the genius part: take coloured polish and paint directly onto the loaded stamper!!!!! What????? Madness?!?!? Wait for it! We are not done ladies and er, gents! Once the polish dries on the stamper: YOU STAMP YOUR NAIL!!!! This is stamping in colour people! We have gone from the dot matrix printer to a full on colour laser printer! Ok, I’m really excited about this and, I’m sure plenty of others have already figured this out but I had not.
So, here it is my Reverse Stamping Sari Print manicure:

20130708-120500.jpg
I love love love the way this turned out and I ended up wearing it for almost a whole week. In fact, I’m still wearing it as I type up this post. The key to success with this technique is using as little polish as humanly possible while still applying enough colour to the stamper using only one stroke. The more polish you leave on the stamper the blurrier your outline becomes.
Have any of you tried this technique? If so let me know how it turned out! Don’t forget to check out the gifted artist who inspired this manicure and get the tutorial on her blog “>Art of Nail
Not sure what to do next but I’m pretty sure it will involve some colour printing

30 Day Nail Challenge Day 30: Inspired By A Tutorial

Last day if the 30 Day Nail Challenge! This last manicure is inspired by a tutorial I watched on YouTube explaining the use of those cute little Fimo/polymer clay nail art canes. I recently snagged a ton of nail art supplies from Amazon and received three wheels of precut polymer clay rod pieces, well I figured you just glue them on and Bob is your uncle but I still wanted the experts to chime in. Turns out you basically glue them on, top coat the shizzle out of them then Bob is your uncle. So I totally tackyfied my nails for this last manicure, I have no idea how these things will come off but I’m sure I can find a tutorial for that too!

20130609-122411.jpg
Sorry for the crappy cleanup! Thankfully I had the presence of mind to photograph my nails before spending the evening in a hot tub because this happened:
20130609-123638.jpg
I guess that answers the removal question! Oddly enough my Cinderella hand is still looking good.

For this look I used:
Seche Vite Base Coat
Revlon cloud, optimistic, sunshine sparkle
Rimmel ethereal
Maybelline Color Show lustrous lime
Hard Candy little hottie

The flowers are from Cheeky Beauty .

30 Day Nail Challenge Day 18: Half Moons

Today I am showing you my half moon design for day 18 of the 30 Day Nail Challenge.
I felt as though I was being too traditional in my interpretations of the themes lately so I played with the theme a little.
I also wanted to work on my dotting technique so I added some dots to the edge of the half moons and on the pink portion of the nail.

20130507-204804.jpg
I downloaded a new app to edit my photos and I may have gone overboard with the features it had to offer.
What do you guys think? How have you varied the traditional half moon design?
For this look I used:
Revlon sunshine sparkle
Hard Candy little hottie
Seche Vite Top Coat

Next up in the 30DNC is Galaxies!!!!