Author: Izzy

Hey, Nice Nails! Inspired manicure

Hi all! As I mentioned before, I am on vacation and have been having a hard time accessing my blog remotely. Please forgive this time lag between my last few posts.
Today I have a double whammy for you, not only am I showing you a manicure inspired by the amazing ladies at Hey, Nice Nails!, if you don’t know these ladies from South Beach you have truly been missing out on some fantastic nail art, go to their website and check them out this instant! That’s an order!!!
I am also trying out a new to me UV topcoat by Seche. The manufacturers of the topcoat claim you can use regular polish under the topcoat and that, like the Seche Vite Top Coat, it cures the layers of polish underneath. Too good to be true? Maybe, but me thinks I shall put it to the test! And test it I did, not only did it cure the layers of polish underneath it lasted 10 days!!!!! Yes, I kept my polish on that long. I thought my vacation would be the perfect time to try this product and man, was I right. I really put this product through its paces and it held up amazingly well, while I had a really hard time fighting the urge to pick at my manicure it still managed to look good throughout the 10 day wear period.
Ok, enough talk here are the pictures you actually came here to see:

20130804-120636.jpg
I loved this manicure, it really turned out well. I had been wanting to try a nude manicure for a while but always ended up covering the nude with bright colours.
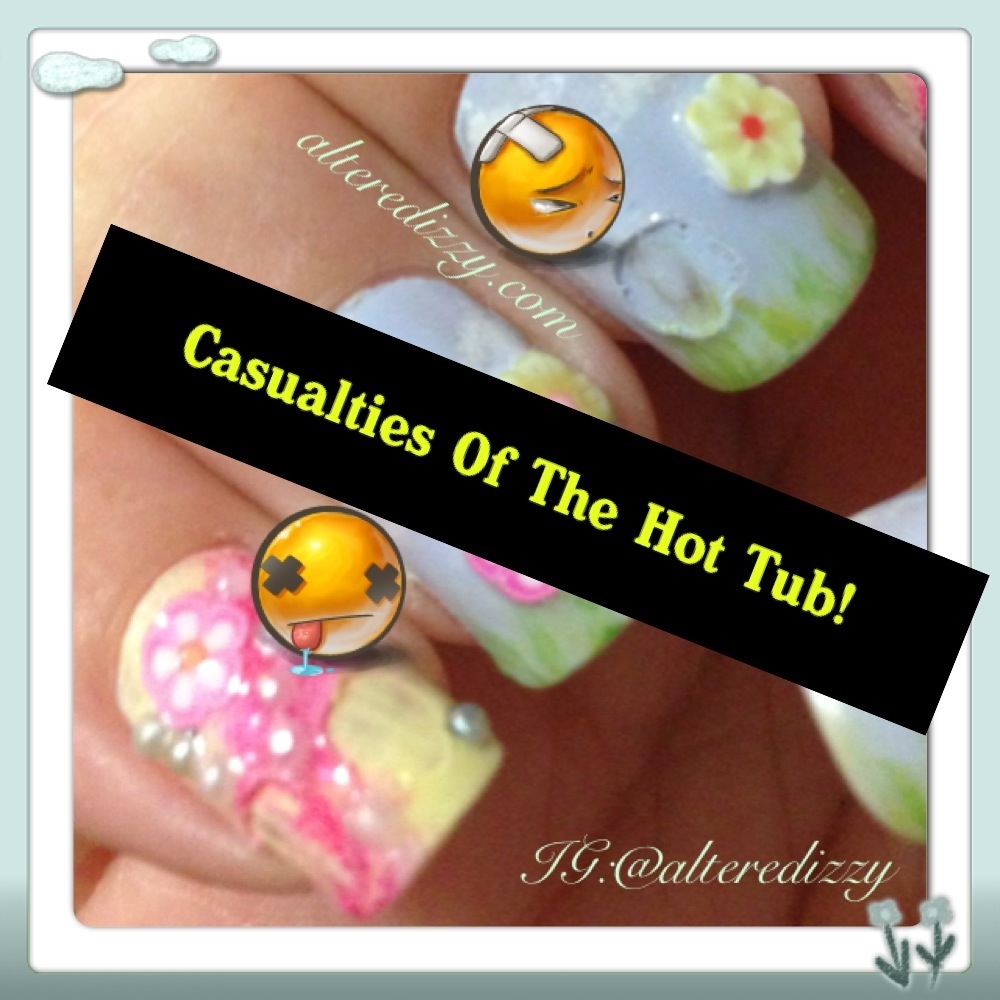
After 10 days the accent nail on the middle fingers peeled off, that was my cue to pick off the polish on the other nails! Lol. Here is a picture of the 10th day of wear:

20130804-121054.jpg
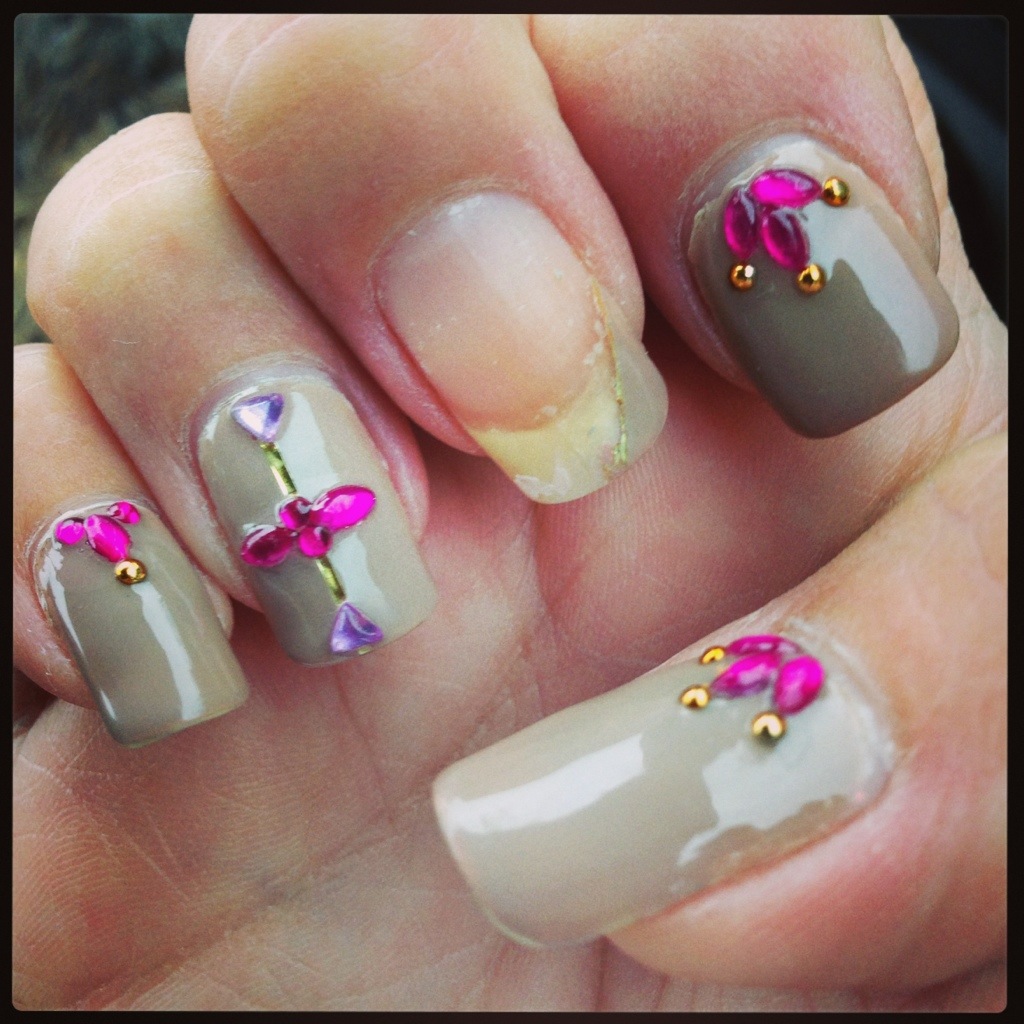
As you can see the other nails don’t look too bad, I suspect the polish peeled off because of the rhinestone adornment on those nails, the other nails were not peeling quite so badly and were only peeling around the edges. Another sign that this is a miracle top coat: NO TIP WEAR! Seriously, there was very little tip wear on my nails, even where I had capped my tips the polish was still clinging to the edge of my nail. This is major, as some of you know, tip wear is usually the reason I change my polish, I hate it! This product eliminated that.
For this look I used:
Seche Vite Base Coat
Essence café olé
Seche Vite UV Top Coat
Cheeky Beauty tape and rhinestones

Next up I will be doing a mermaid nail so stay tuned!

Vintage Damask Nails

Wow, it has been a while since I posted on the blog, I work in education and have been on summer vacation since the end of June, I may have been a little lazy since then lol. That being said, today my manicure is reminiscent of a vintage damask cloth, damask is a woven fabric with a pattern that is visible on both sides. It also reminds me of vintage tea towels from the 70’s, so an orange and teal colour pallet it is!

20130722-223849.jpg
I used the reverse stamping technique again, seriously this is the best technique ever! I’m not 100% in love with this mani but it is a fun colour pallet and I wore it for nearly a week!

For this look I used:
Seche Vite Top Coat
Revlon cloud, eclectic
Sally Hansen Xtreme Wear perky pink
Maybelline Color Show sweet clementine
Ice shell pink
Essence date in the moonlight
O.P.I. Fast dry top coat

Plates used:
Pueen 38, 48

The rhinestones I used are from my huge haul from Cheeky.

Up next on the blog is a pink art nouveau manicure!

Reverse Stamping Sari Print Manicure

Hello readers!! Today I have a super duper exciting manicure and new technique to show you! I’m calling it Reverse Stamping and I discovered it on the amazing Art of Nail blog! This woman is a genius! You start off your stamping process as usual: put the polish on the plate, scrape off the excess, use your stamper to pick up the design. Here comes the genius part: take coloured polish and paint directly onto the loaded stamper!!!!! What????? Madness?!?!? Wait for it! We are not done ladies and er, gents! Once the polish dries on the stamper: YOU STAMP YOUR NAIL!!!! This is stamping in colour people! We have gone from the dot matrix printer to a full on colour laser printer! Ok, I’m really excited about this and, I’m sure plenty of others have already figured this out but I had not.
So, here it is my Reverse Stamping Sari Print manicure:

20130708-120500.jpg
I love love love the way this turned out and I ended up wearing it for almost a whole week. In fact, I’m still wearing it as I type up this post. The key to success with this technique is using as little polish as humanly possible while still applying enough colour to the stamper using only one stroke. The more polish you leave on the stamper the blurrier your outline becomes.
Have any of you tried this technique? If so let me know how it turned out! Don’t forget to check out the gifted artist who inspired this manicure and get the tutorial on her blog “>Art of Nail
Not sure what to do next but I’m pretty sure it will involve some colour printing

Magical Unicorns

As promised in my last post here come the unicorns! I’m not usually a unicorn type of girl but lately I’ve been digging pastels and for some reason it also makes me think of a unicorn colour pallet. I started with some pastel base colours and a metallic accent, on the pastel blue index fingers I finally got around to using an O.P.I. glitter from the Wizard of Oz collection. I then stamped on some designs from my Winstonia and Pueen nail plate sets. I wanted the thumb and pinkie to look like my unicorn was running then leaping into the air, so I changed the orientation of my stamp before applying it to the nail. Added some bling and a top coat and Bam! Chapter!

20130704-112420.jpg
I love the way this turned out, this may be a little too girly for some but I really liked wearing it out and I received a few compliments on them. Whoot! Whoot!

For this look I used:
Seche Vite Base Coat
Revlon cloud, sunshine sparkle, vixen
Sally Hansen Xtreme Wear bubble gum pink, celeb city
Hard Candy crush on raisin
O.P.I. Lights of Emerald City
O.P.I. Rapid Dry Top Coat

Nail plates used:
Winstonia W111, W117
Pueen 46

Stay tuned, I will be trying out a new stamping technique for my next manicure it should be interesting…

Neon Watercolor Bubbles

Today we have a neon watercolor manicure using a new (to me) technique. I’ve done watercolor manicures before but I used nail polish and acetone to achieve the look, this technique uses watered down acrylic paint.
1) Start with a base coat of neon pink and white polish as per usual.
2) Take some plain old acrylic paint and water it down (the amount of water will determine the sheerness of your bubbles).
3) This is where the patience comes into play: apply drops of the thinned paint onto your nail, let it dry around the edges (it becomes matte as it dries) and soak up the remaining liquid in the center using a pointy cotton swab. Repeat the process until all the nails are done, this takes a really long time but it looks amazing!
4) Top coat as usual.
I used acrylic neon paints and the bubbles literally glow in the daylight!

20130630-142606.jpg
I want to give credit to the wonderful nail artist who inspired the technique but I can’t for the life of me find her again. If anyone knows who demonstrated this technique please let me know so I can give the credit. *Update! Thanks to my instagram friends I have figured out where I saw this technique! The wonderfully talented @nail28tsenwei showcased the technique but it was @madamluck that was the inspiration for my look
For this look I used:
Seche Vite Base Coat
O.P.I riotously pink
Revlon spirit
Delta acrylic craft paint neon pink and neon yellow
Miracote top coat

No nail plates this time!
Next up I will be channelling my inner 6 year old and doing a pastel unicorn mani, stay tuned!

80s Prom Dress

Today’s look is inspired by the sea foam lace commonly incorporated into the typical 80s prom dress. Just kidding! I actually wanted to use a sea foam green polish, a nude polish and, a rich yellow gold polish I recently purchased at my local pharmacy. I used my Pueen Love Elements stamping plates to stamp on some romantic lace roses and some cute vines.

20130624-170801.jpg
I really like how the gold nails with the white lace turned out! The gold happens to be from the Sun Kissed collection by Essence and it is really nice in person!

For this look I used:
Seche Vite Base Coat
Essence Nude ice strawberry cream
Essence Sun Kissed my sunny side
Revlon jaded, cloud
Miracote top coat

Nail plates used:
Pueen Love Elements 27, 33

Next up I’m going to try some water spotted nails so stay tuned!

English Rose Garden Using Butter London Nail Skins

For this look I decided to incorporate some Butter London Nail Skins I scored for the low price of $6.99 at Winners.

20130619-172000.jpg
The nail skins are made out of vinyl-y style material, I think you are supposed to stick them on top of your natural nail and wear as is. I couldn’t help doing a bit of izzyfication to these.

20130619-172246.jpg
I used one of the Pueen plates to
Stamp a cute vine design on the green nails and a rose image from the same plate.

For this look I used:
Quo strong bond base coat
Quo wild child
Maybelline Color Show lustrous lime
Rimmel black satin
Tweets H2O nail color TBL
Miracote top coat

Nail plates used:
Pueen 33

Dazzling Retro Chandeliers

Today my manicure is a retro chandelier look with lots of glitter. I love chandeliers, I spent most of my childhood living in Europe visiting churches and castles, the nobles and the clergy always have the best chandeliers!
So here it is:

20130616-113032.jpg
I really like the black and chartreuse glitter combo. This colour pallet reminds me of those old school hard cover books they had in the seventies.
I also tried a new base coat product on this one the Quo by Orly strong bond rubberized base coat.

20130616-120743.jpg
It goes on clear with a dull finish, dries quickly, that is always a plus in my book, and my first coat of polish went on really well. This last point is really important, some base coats tend to leave bald spots when applying the first coat of polish, the strong bond did not. Bam! This may just become my new favourite base coat. *update: I wore these for three days and they withstood two evenings in the hot tub before they started chipping. This is a great product in my book! I will definitely be using it again.

For this look I used:
Quo by Orly strong bond rubberized base coat
Essence LOL, off to Miami!
Nicole by OPI brilliant idea
Rimmel black satin
Sally Hansen Xtreme Wear celeb city
Miracote top coat

I used Pueen stamping plate 26 for the accent nails.

Stay tuned for my next look.

Ahoy Mates! Nautical Manicure

The 30 Day Nail Challenge has finally come to an end. While I enjoyed being guided by the challenge I now have to take the training wheels off and come up with my own manicure ideas. I bought a great looking red from Revlon called velvet rope, it’s a nice deep red with no sparkles or shimmer, a true blood red. I also scored a whole bunch of striping tape from Cheeky Beauty for an incredibly low price! I love the Cheeky Fairies, I’ve bought nail plates, rhinestones and, striping tape from them, they truly have amazing deals.
So enough talk here is my nautical look tape manicure.

20130613-154751.jpg
The little red pearls I used were also from my giant order from Cheeky Beauty. They have a flat back and you apply them using a little bit of clear polish, I love the way they look but they bled a little when I applied my layer of Miracote Top Coat. I don’t think it would have been as noticeable on a darker base. I did the same thing with the star accents, I dabbed a little bit of clear polish on and pressed the star into place. Add a layer or two of topcoat and Bob is your uncle!

Have any of you tried adding rhinestones or gleequins to your manicures?

For this look I used:
Seche Vite Base Coat
Revlon velvet rope
Revlon spirit
Essence date in the moonlight
Miracote tip coat
Striping tape, stars and, pearl accents are available from Cheeky Beauty

Stay tuned

30 Day Nail Challenge Day 30: Inspired By A Tutorial

Last day if the 30 Day Nail Challenge! This last manicure is inspired by a tutorial I watched on YouTube explaining the use of those cute little Fimo/polymer clay nail art canes. I recently snagged a ton of nail art supplies from Amazon and received three wheels of precut polymer clay rod pieces, well I figured you just glue them on and Bob is your uncle but I still wanted the experts to chime in. Turns out you basically glue them on, top coat the shizzle out of them then Bob is your uncle. So I totally tackyfied my nails for this last manicure, I have no idea how these things will come off but I’m sure I can find a tutorial for that too!

20130609-122411.jpg
Sorry for the crappy cleanup! Thankfully I had the presence of mind to photograph my nails before spending the evening in a hot tub because this happened:
20130609-123638.jpg
I guess that answers the removal question! Oddly enough my Cinderella hand is still looking good.

For this look I used:
Seche Vite Base Coat
Revlon cloud, optimistic, sunshine sparkle
Rimmel ethereal
Maybelline Color Show lustrous lime
Hard Candy little hottie

The flowers are from Cheeky Beauty .